×
You’ve done all of the planning. You’ve picked the perfect time for your long overdue vacation. You’ve earned those glorious few days in the Disney Bubble, and you know exactly which Disney Vacation Club (DVC) resort will welcome you home that day. There’s just one little problem.
When you pull up the DVC website to book your room, Disney’s system breaks your heart. The results page informs you that your room is booked! Don’t fret, though! All is not lost. Many DVC rooms become available at a later date. You just need to know how to work the system. Here’s a guide on how to Waitlist your DVC reservation.
The Basics

The way that you plan your DVC resort will remain the same. You’re still going to select the room type that you want at the resort that you’d prefer on the days that you need. The only difference is that you’re not going to get to book the room like you’d prefer.
Instead, you’ll receive one of the two dreaded DVC messages that inform you that your room request isn’t available. Those messages are:
- No offers were found that matched your search criteria. Please try changing your dates, Resort or room type.
- Your selection is not available. Please select an alternate Resort or edit your search criteria and try a new search.
The first message indicates that you’re trying to book a popular date, and no DVC resorts in the area have availability. This status update indicates that you’re facing a real issue with DVC room availability.
The second message is better news. While you can’t book the room type that you want at the hotel you prefer, you do have options available. This status update means that DVC has some rooms available, just not the one you want.
The Supply and Demand of DVC Rooms
Don’t worry! You can waitlist a room after either message, though. That leads to a note about how the Waitlist system works from Disney’s perspective.
Disney wants to maintain a high occupancy rate at their DVC resorts. The company releases the contractually obligated number of rooms to DVC members and sometimes even adds more than legally required. When you get the message that a room type is booked, Disney’s system is saying that they’ve reached maximum occupancy for the DVC allotment.
The various resorts could open more rooms to DVC members at any point. Your Waitlist request positions you in a virtual line queue. You’re hoping that a room becomes available. Similarly, many DVC members book reservations only to cancel at a later date. They may have conflicts that could prevent a visit, or they could be waiting for a Waitlist to open, just like you.
That’s why the Waitlist system is so important to you and to Disney. You’re telling the company that you want to stay in a particular room on a set date. Disney’s seeing how much demand they have for various room types on certain dates. They can add more DVC rooms if they have enough availability. Disney also receives protection against a slew of hotel room cancellations. The company knows that it has other potential customers if the current ones can’t stay in the rooms.
How to Create a Waitlist Reservation
When you reach the search results page and see that your room type isn’t available, don’t panic! Disney has made the Waitlist process as easy as possible.
The first thing you should do on the page is scroll down slightly. You’re now looking at a section entitled Your Resort Offer. Directly below this head is a tantalizing picture of the DVC resort where you want to stay, along with a cruel message that you can’t.
Glance down the page a bit more. Stop at the section entitled Availability. This part is easy to spot since it includes a number of giant X’s marking the spot where you’d hoped to see room availability. Any date with a giant X over it is currently booked. You’ll need to set up a Waitlist for the applicable date(s).

The good news is that you’re already on the right line to start a Waitlist. Look to the right of the giant row of X’s. You should see a message like:
Waitlist This Entire Stay:
December 20, 2017 – December 27, 2017
(137 Vacation Points)
The message looks the same on a computer or smart device. It’s also a hyperlink, which means in non-computer geek terms that you can click it to reach the page you want. You want to click this link to set up a Waitlist request.
Disney will offer a pleasant message that you should kick back and relax while they process your request. After a moment, you’ll arrive at the Waitlist Request application form. This is the first of four pages that you’ll click through to create your Waitlist.
Page One: Add to Waitlist – Customize Request
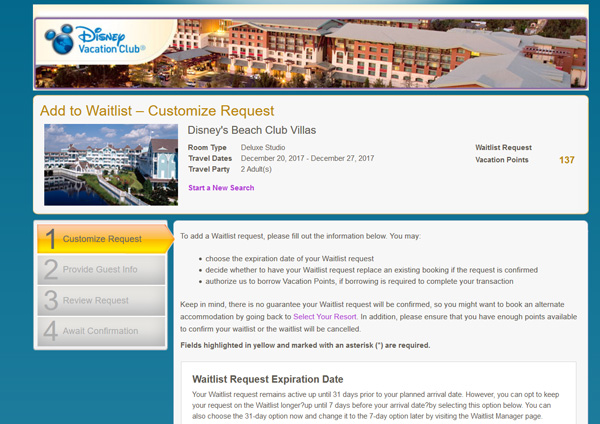
The first page of the application process is the place where Disney confirms your desired room type. You will need to answer a few important questions on this page.
The first question may seem strange. Disney asks when you want to set your Waitlist Request Expiration Date. For your sake and for Disney’s, a Waitlist isn’t possible past a certain date. You need to know exactly where you’re going to stay, and Disney needs to know which guests will inhabit their rooms.
That’s why they’ve set up a pair of deadlines for Waitlist requests. Your options are:
- 31 days prior to arrival date
- 7 days prior to arrival date
If you choose 31 days, Disney will stop trying to honor your Waitlist request 31 days prior to your arrival. Basically, you’re telling Disney’s booking system that you want to know a month of time if you’re not going to get your Waitlist.
People select 31 days as an option when they’re not sure they’re going to make a trip. The thinking is that you need at least a month to plan a Disney vacation. If you don’t get your Waitlist, you may not visit Disney at all.
Alternately, you may just want to know well ahead of time. That’s especially true of guests who like to make Advance Dinner Reservations. You could book a reservation at Boma when you think you’re staying at Disney’s Animal Kingdom Villas – Jambo House. If you unexpectedly get your Waitlist request for Disney’s Polynesian Village Resort, you’ve suddenly booked dinner a long way from your DVC resort.
By choosing seven days, Disney will attempt to honor your Waitlist request all the way up until one week before you arrive. You should pick this option if you’re sure you’re going to make your trip. That way, you maintain a chance at getting your preferred room type all the way up until the last seven days.
The only downside to the seven-day option is if you’ve added Magical Express to your reservation. If your Waitlist request triggers, you need to make sure to let the people at the Magical Express counter know. Otherwise, they could potentially try to direct you to the wrong bus and, thereby, the wrong resort.
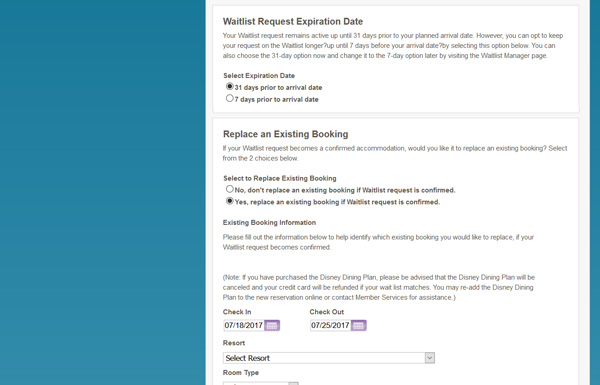
You then must select whether you want the Waitlist booking to replace a current one. This isn’t applicable unless you’ve booked a different reservation. If you have, you’re telling Disney to update your old reservation to give you the preferred room type. Your options here are:
- No, don’t replace an existing booking if Waitlist request is confirmed.
- Yes, replace an existing booking if Waitlist request is confirmed.
Pick the one that best fits your current vacation plans.
The next section of page one is basically a verification request. Disney again asks you for the booking dates, DVC resort, and room type that you would prefer. They do this to reduce the chances of someone entering the wrong date for a Waitlist.
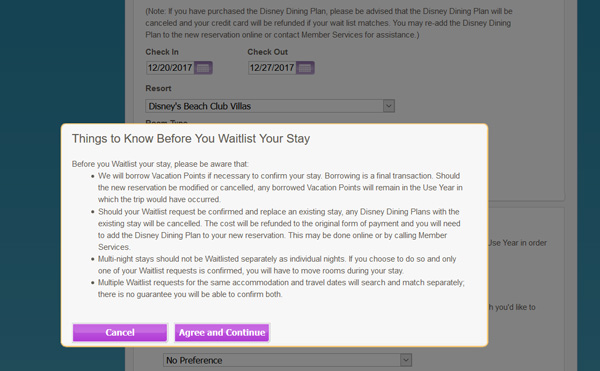
The final section of page one is an important one. Disney asks if you are willing to borrow vacation points as needed to book a reservation. If so, you must select a Home Resort. Pick the one that has the points you need to borrow for the reservation.
Even if you don’t think that you will need the extra points, you should still fill this out. You don’t want to miss out on a Waitlist due to a lack of points. That’s an easily avoided mistake.

Page 2: Add to Waitlist – Provide Guest Information
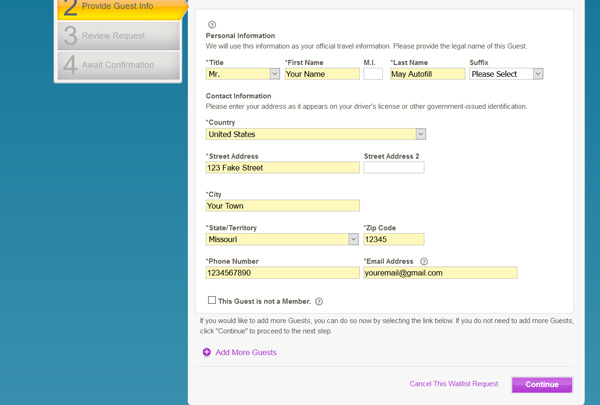
The second page is self-explanatory. You’re filling out a hotel reservation. Better yet, the Disney system is smart. Once you’ve booked a DVC room with them once, the system stores your data. The guest information page will auto-fill results from that point forward. So, you may not need to do any data entry here, which is convenient for smart device users. If you do, it’s a basic information request. The most important thing to remember is to list every guest in your room. Otherwise, you won’t receive the appropriate number of Magic Bands, Magical Express luggage tags, and Disney Dining Plan entitlements (if applicable).
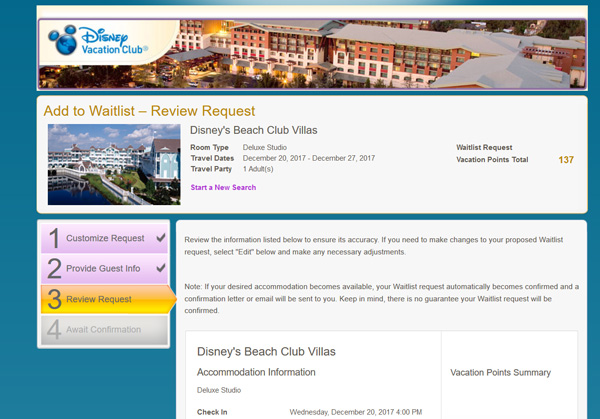
Page 3: Add to Waitlist – Review Request
This page is the easiest to complete. You will only need to check one box at the bottom of the page. You should pay careful attention to the information on this page, though. It’s a verification step to make sure that you are creating a Waitlist for the date, DVC resort, and room type that you want. Any incorrect information will lead to disappointment once you arrive at Disney.
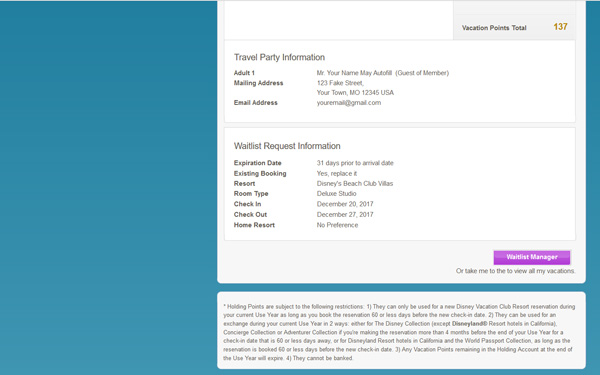
The Review Request displays check-in and check-out details, along with the size of the travel party and your DVC member number. It also has a large box that shows how many DVC points you will spend on the trip. The next section shows travel party details. The section after that confirms your two choices from page one: 31 or 7 days and whether you want to replace an existing booking or not.
The only remaining thing that you need to do is read the terms and conditions. You must scroll through these before the system lets you check the corresponding box. In doing so, you confirm that you’ve read the terms and conditions.
Page 4: Add to Waitlist – Await Confirmation
Congratulations, you have created a Waitlist request! The fourth and final page is just a confirmation screen. You should see this message:
“You have successfully completed your Waitlist request. A summary of your request is displayed below. If your request is confirmed, you will receive a confirmation email.
You can also check the status of your Waitlist requests by selecting “Waitlist Manager” below. Or, you can return to the Vacation Center by selecting the appropriate link below.”
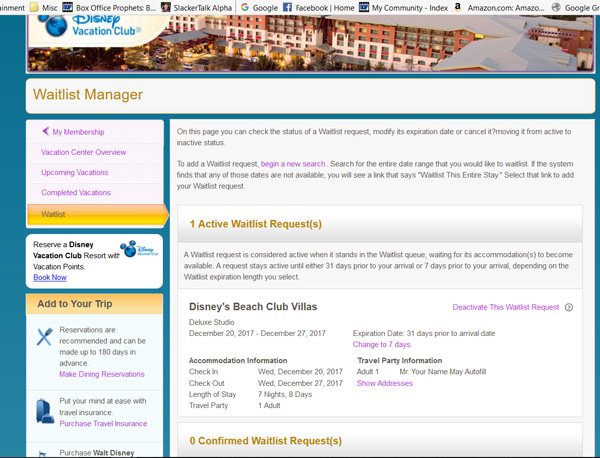
You will receive email confirmation of the request as well. If you’re impatient like me, you have another option. You can look under the My DVC Membership tab on DisneyVacationClub.com. The My Vacations section has a Waitlist tab. Click this link. Presuming everything has gone right, this message should display:
“1 Active Waitlist Request(s)”
Obviously, if you have more than one Active Waitlist Request, the number will be different. The point is that you have done what you wanted to do! Yay, you!
One Last Thing…
Should you change your mind about the Waitlist request, you can always return to this page. One of the options here is, “Deactivate This Waitlist Request.” If you click this link, a confirmation screen will appear. Again pick the “Deactivate This Waitlist Request” button to cancel your Waitlist selection.
So, there you have it. You now know how to create a Waitlist, what your options are setting up your Waitlist, and what the pages look like in the Waitlist Request system. You should be good to go. Good luck, and enjoy your trip!